Motorcycle ignition systems can be quite confusing, especially if have zero experience working on them. However, once you spend a few minutes in order to get a quick overview of what each component does and what it’s used for, then it all becomes quite simple. Luckily, most motorcycle ignition systems and their components are really simple and easy to troubleshoot – like the CDI.
But can a bike run without a CDI?
If the bike has a CDI, then it will not run without it. The CDI plays a crucial role in producing spark – if the CDI is bad or removed completely, then the bike or ATV will never run. You can consider the CDI as the Engine Control Unit (ECU) of the bike, and it actually is in a very basic sense. There is no way to make a bike run without a CDI, exactly the same way as it would be impossible to make a car run without the ECU.
But what does the CDI do and how do you test a CDI? We’ll cover that and much more in this article!
Can You Bypass a CDI?
No, it is unfortunately impossible to bypass a CDI and make the engine run without it.
However, you can quickly supply 12V from the battery straight to the ignition coil and see if it produces a spark and that’s it. It is impossible to make the engine run that way.
While this trick can be used to test an ignition coil, I would not recommend doing it as the ignition coil should only be energized for a split second and it’s difficult to do so by hand.
The CDI supplies a high voltage signal for only a few milliseconds and if you manually supply it for longer than that, then you will likely overheat the primary winding of the ignition coil and make it burn out.
What Is a CDI and How Does It Work?
The Capacitor Discharge Ignition box (CDI) is a critical ignition system component that fires the spark plug and adjusts ignition timing.
But how does it fire the spark plug and know when it’s time to do so?
First off, the key to understanding the CDI lies in its name – Capacitive Discharge Ignition.
The motorcycle’s stator feeds the CDI with power, which is then used to charge the high voltage capacitor. The power feed from the stator/alternator is usually at a range of around 50 VAC to 200 VAC, depending on the type of system.
Once the capacitor is charged, the magneto sends a timing signal to the CDI. The timing signal is crucial as it is the one that actually fires the spark plug.
Now, once the 12 VAC timing signal reaches the CDI, it opens the SCR (Silicon Controlled Rectifier) which then quickly discharges the high voltage capacitor straight into the primary winding of the ignition coil.
The current from the high voltage capacitor then creates a magnetic field, which then collapses and induces a super high voltage (10,000 to 40,000 Volts) surge in the secondary winding which finally creates a spark.
Bad or Defective CDI Symptoms
Depending on the motorcycle and the internal circuitry design of the CDI, there can be a few different things that can go wrong and cause the CDI to fail.
However, the three most common symptoms of a bad or failing CDI box are:
- 1. No spark on all or half of the cylinders
- 2. Intermittent no start
- 3. Misfiring
With that said, CDIs usually fail abruptly and stop producing spark for all of the cylinders. In rare cases, 4-cylinder motorcycle CDIs can stop producing spark for 2 cylinders.
Interestingly, most OEM CDIs can last for multiple decades or over 50,000 miles. The reason for that is that they are usually quite simple in design and don’t have any moving parts that can wear out.
However, CDIs do fail once one of the multiple electrolytic capacitors inside dries out or bursts. Once that happens, you can disassemble the CDI carefully and replace the capacitors with modern equivalent types.
CDIs can also go bad once one of the transistors inside fails. Transistors are tasked with grounding the ignition coils, and thus are exposed to a miniature electrical shock every time the CDI sends a spark.
This exposure to electrical shocks wears the transistor down over time and can eventually cause the transistor to fail and stop working. Once that happens, you will need to replace the transistor in order to make the CDI work again.
Now, when it comes to aftermarket replacement CDIs for old bikes, they’re usually poorly designed and use poor materials that fail within a few years or a few thousand miles. Because of that, we recommend repairing the original CDI if possible.
How To Diagnose a Bad CDI
Diagnosing a bad CDI is best done by utilizing the elimination method. Since the CDI is very difficult, if not impossible, to test – the only way to determine if it’s bad is by checking all the inputs going to the CDI.
If the CDI is getting good ground, power, and a good timing signal, then we can be confident that the CDI is bad and needs to be replaced. For a full guide, check out our complete No Spark Troubleshooting Guide.
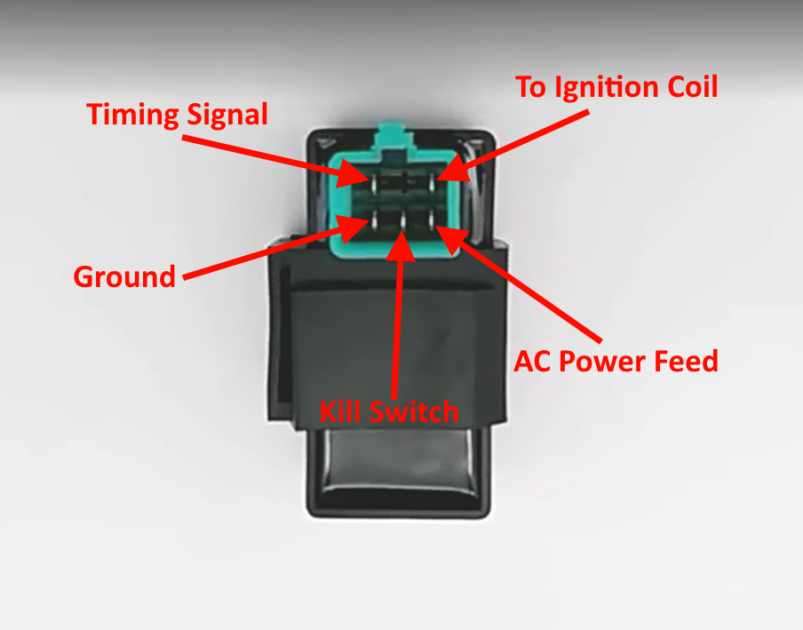
Note: the following testing procedure only applies to a 5 pin CDI.
1. Bypass the Kill Switch
When you’ve got a no spark condition on your bike and you’re suspecting the CDI – bypassing the kill switches will oftentimes bring your bike back to life.
You can bypass the kill switch on a 5 pin CDI by removing the center pin from your CDI connector or just cutting the wire. Once the kill switch pin or wire is no longer connected to the CDI connector, then you can plug it back in and try starting the engine.
2. Verify the Grounds
If the kill switch bypass didn’t work, then it’s time to check if the CDI is getting good ground. Verify it using a test light, as it will actually load the circuit. That’s the only way to properly test wiring, but it’s not always an option.
3. Verify the Power Feed
After you’ve verified that the CDI is getting good ground – it’s time to check the power feed. Be very careful when testing, since the CDI should be getting a high voltage power feed, which can shock you.
Start cranking the engine and verify that the CDI is getting power. It should be getting at least 50 VAC from the alternator (depending on the system, check your service manual if unsure).
4. Verify the Timing Signal
Since the CDI must get a timing signal from the magneto inside the alternator, we will have to verify that the signal is there.
While cranking the engine, test for AC voltage at the timing signal pin. You should see a fluctuation of 0.2 – 0.4 VAC.
5. If Everything is Fine – Replace the CDI
If you’ve checked and verified that all the inputs going to the CDI are working as they should, then the only logical conclusion is that CDI has gone bad and needs to be replaced.
Conclusion
The CDI is a vital component of the bike’s ignition system. Without the CDI – the bike cannot run and there is no way to bypass it.
Unfortunately, testing a CDI directly is not really possible, therefore it’s always done using the elimination method. By verifying that the CDI is getting all the inputs that it needs to work, you eliminate everything else apart from the CDI.
If the CDI is getting all it needs to work, but it still does not fire the spark plug, then it’s time to replace the CDI.
Jake is the site’s primary contributor.
Motorcycles and automotive repair have been a big part of his family for generations, therefore it’s only natural that he decided to become a heavy-duty diesel tech.
Outside of work, you’ll find Jake restoring and riding rare street bikes and ATVs.
83 gs850 fires on 1&4 swaped coils no difference, new coils same thing , changed pickup coils same thing ,changed cdi (used) same problem, can only get power from o/w and w wires from cdi , nothing from o/w and b/y wires. Exactly same thing on other cdi , all have good continuity , any help would b great ,thanks
Hi!
I’m not familiar with the GS850, but I did some research and looked over the wiring diagram. I would think that you have a corroded b/y wire going to the ignition coil for 2 & 3 plugs, one of the signal generator wires going to the ignitor, or the signal generator itself is bad.
You can check the b/y wire output at the CDI to eliminate the b/y wire. If there is nothing happening at the CDI, then the only thing left is the signal generator circuit or the CDI itself.
Also, to be 100% sure if a wire is good, you need to load the circuit with a test light. I’ve had times where wires ohmed fine, but they would become open when I loaded them with a test light. I guess the heat from the current makes the resistance at the corrosion area increase.
Hope this helps and good luck!