Working on ATV charging systems can be quite intimidating, especially if you aren’t familiar with how they work.
Fortunately, the charging system on pretty much all ATVs is really simple, and you can get the basics down in 15 minutes or less. All you need is to get a quick overview of what each component does and what symptoms does it produce once it goes bad.
If you’re suspecting that your ATV’s stator is going bad or has failed, then this article is just for you.
We’ll cover bad stator symptoms on ATVs and how to test them.
Bad Stator Symptoms (ATV)
When the stator goes bad, it usually produces these symptoms:
- Weak Charging Voltage – once the stator starts going bad, it will gradually produce less and less voltage while the engine is running
- No Charging Voltage – if the stator burns out and fails, the ATVs alternator will stop charging the battery completely
- No Spark – some stators power the CDI directly, if they fail then the CDI won’t produce spark
- Rough Idle – a bad stator will lead to weak spark
- Dim Headlights – a bad stator will not supply enough current to fully power headlights
- Sluggish Acceleration – due to weak spark
What is a Stator & What It’s Used For
In case you’re not totally sure what the stator is and what it’s used for, here is a quick reminder. For a full explanation of what a stator is, how it works, and what it’s used for, check out this article – What Does a Stator Do on a Motorcycle.
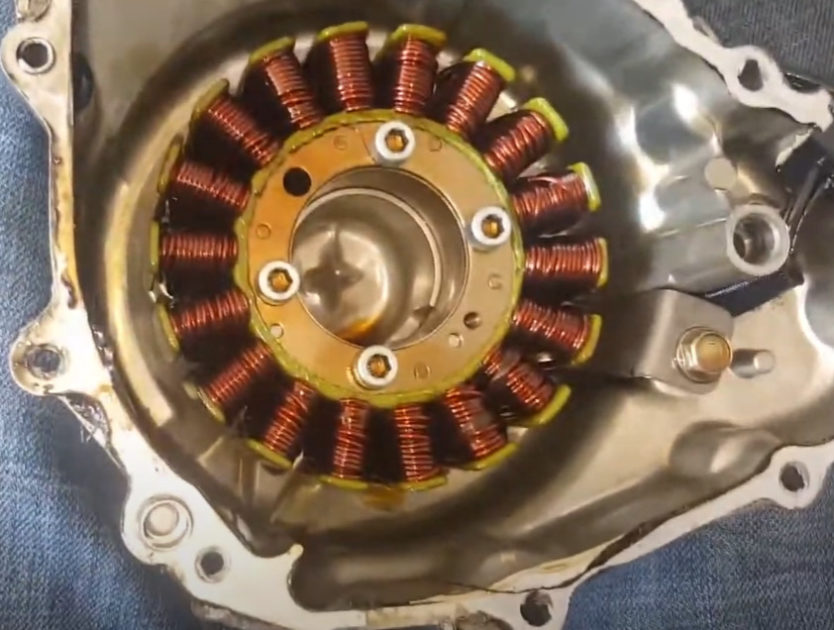
To put it simply, the stator is the stationary half of the ATV’s 3-phase generator (commonly known as the alternator). When the rotor, also known as the magneto on ATVs, spins around the stator, it induces an electrical current inside the copper windings of the stator.
That induced electrical current inside the stator is used to power the ATV’s electrical system and to charge its battery. Some stators have one or multiple coils that are dedicated to power the CDI.
How To Test an ATV Stator
Testing the stator of an ATV is really simple. All you will need is a multimeter – that’s it. A service manual with the proper specifications would be tremendously helpful but is not needed.
1. ATV Stator Short to Ground Test
First, you need to locate the stator wiring harness. It usually has three wires of the same color. Try to look for the wires coming out of the alternator/magneto cover – that should be your stator harness.
Follow the harness to the connector and disconnect it.
Now, turn on your multimeter and select the continuity mode (Ω).
Take the stator side of the harness and check for continuity to ground on each of the three wires.
You can do that by touching one lead of the multimeter to the battery negative, the engine, or any other bare metal part of the ATV, and then touching each of the connector terminals with the other lead. Do not spread the contacts, because that might result in connection problems later.
There should be no continuity to ground at all. If there is, then your stator is bad and needs to be replaced.
2. ATV Stator No Load Performance Test
The short to ground test is not 100% foolproof, therefore you need to follow up with the No Load Performance Test.
Actually, this test can alone determine if the stator is good or bad, but you need to know which values to look for.
Different model ATVs produce different output voltages at the stator, therefore you need to know which values are good and which ones are unacceptable. You can either search around for a service manual or look around forums.
With that said, here’s how you should do this test.
Make sure that the stator harness is disconnected.
Set your multimeter to VAC (V~) as we will be measuring alternating current.
Start the engine and raise the RPMs to around cruising speed (2000-3000 RPM). Now touch one lead of the multimeter to one of the stator connector terminals and the other to the other terminals. Make sure to test all three combinations. Total of three measurements.
The ATV stator output voltage should be >70 VAC at cruising RPM. Depending on the specific model, 60 VAC can be acceptable too. Consult your service manual if unsure.
If the stator output is less than 50 VAC, then it needs to be replaced.
Final Thoughts
The ATV’s stator is a very simple component and it’s pretty simple to test too.
In most cases, the stator will start to go bad gradually and give some obvious warning signs and symptoms.
The most obvious and common bad stator symptoms for ATVs are low or no charging voltage. The stator usually starts producing less and less charging power to the battery and will eventually burn out and stop producing electrical power completely.
Jake is the site’s primary contributor.
Motorcycles and automotive repair have been a big part of his family for generations, therefore it’s only natural that he decided to become a heavy-duty diesel tech.
Outside of work, you’ll find Jake restoring and riding rare street bikes and ATVs.
I have a 1986 Yamaha moto 4 YFM80 that I’m unable to start.
When I crank this engine with the timing light connected I’m getting a 60 degree advanced spark.
The flywheel is located properly on a good keyway
The compression is okay and I’ve installed a new carburetor
I’ve injected either directly into cylinder and it fires (puffs) but unfortunately toò early Before TDC
It’s not a compression or fuel problem
Unfortunately I can’t buy a new CDI # 55X-85540-M2 from a reputable dealer or for anywhere for a reasonable price
I have purchased two used CDI’s from eBay but one was totaly unusable and the other produced the exact same 60 degree advanced timing? Confusing me to suspect that it may be the source or pick up coils
‘Is it possible for a CDI to produce advanced spark”???
I’ve tested my source coil and get 384 ohms see (spec is 380 ohms +/- 10 %
and my pickup coil reading is 318 ohms ( spec is 330 ohms +/- 10 %
The numbers on CDI are 55 X M2
Please offer any advice
Thank You ok
Hi James!
Unfortunately, I’m unfamiliar with the YFM80, but I did find some info online that might be useful.
According to the service manual, the YFM80 has an electrical spark advance, which I assume means that the CDI advances spark relative to the timing signal. It’s possible that the CDI is producing spark way too early.
The only way to be sure is to eliminate everything else, since the CDI is practically impossible to test.
You have to be 100% sure that the ignition timing is set properly mechanically, which I assume you did, but I would highly advise checking again just in case. Next, we can rule out the source coil since it produces good enough spark to fire the engine even if it’s way too early. The source coil doesn’t affect timing, it just produces the voltage for spark.
Now, the pickup coil is what is producing the timing signal for the CDI to fire the spark plug. From what I can see online, the pickup coil is fixed in its position and it will not advance timing on its own. So the pickup coil is relying on the mechanical timing to be perfect and if it’s wrong, then the CDI will fire the spark plug at the wrong time.
You could test the pickup coil timing with an oscilloscope or a test light and reference it to the timing light. If the pickup coil signal is advanced 60 degrees or more, then the mechanical timing is off, and if the pickup signal is at 10 or 20 degrees, then it’s the CDI that’s producing the advanced timing.
To be honest, I’m really unfamiliar with the YFM80, so take what I wrote with a grain of salt, as it might be completely wrong!