Here’s a sad scenario:
Last week we had perfect riding weather, so naturally, I and my motorcycle buddies decided to meet up somewhere and go for an evening ride. You know – the usual. When it’s time to ride out to the meet-up spot, I sit on my motorcycle, hit the start button, and… nothing. Not even a click from the starter relay.
At that point, my plans for that day were ruined, but I got lucky. What if it happened in the middle of nowhere? Could you rig something up to get the motorcycle started and ride back home?
How to Diagnose a Motorcycle That Won’t Start – No Clicking
There are a lot of reasons why a motorcycle would not start, however, the fact that you can’t hear the starter relay clicking, most likely means that the starter motor itself is not the problem. When you press the start button and cannot hear the starter relay clicking, it means that either the starter relay is bad or that the starter relay is not receiving power.
Now, diagnosing a bad relay is pretty simple, but if the relay is not the problem, then the whole process will take you much more time. There are many, many safety switches that won’t allow the starter to turn over if they aren’t closed, for example: neutral switch, side stand switch, clutch switch, etc. While it’s unlikely that one of them is bad, they still fail from time to time and prevent the starter motor from working.
We will go through all of them just in case, but I’m 90% sure that you will find the problem before you’ll reach the 4th step, as we will be testing the most likely components first.
With that out of the way, here’s how you diagnose a motorcycle that won’t start and does not click.
1. Check The Battery Voltage
Let’s start with the basics first, as they’re so easy to overlook. Some motorcycles (especially the more recent ones) are designed to stop the rider from starting the engine if the battery voltage is low.
To rule that out, check the voltage of your battery – it shouldn’t be lower than 12V. Ideally, it should be around 12.4-6V. Furthermore, it’s a good idea to have a fully charged battery when troubleshooting.
2. Check The Starter Relay & The Starter
Now that we know that the battery is in good condition, let’s skip right to the most likely culprit – the starter relay.
Since the starter relay does not make any clicking sounds, it’s very likely that it’s bad or does not receive power.
To test the relay, get your test light out. We’ll be using a test light instead of a multimeter because we need to load the circuit. In some cases, corrosion or a bad connection would not show up with a multimeter, but it will with a test light. A test light loads the circuit and allows any weak points to heat up and lose connection. It’s the only way to properly test a circuit.
With that out of the way, let’s check if the starter relay is receiving power
First, disconnect the two smaller gauge wires that go to the relay – these two wires are on the control side of the relay. Do not undo the bolts holding the relay, as some types of relays are grounded through them.

Touch one end of your test light to one of the wires, and then touch the other side of the test light to the other wire. Turn the ignition on, select neutral, side stand up, pull the clutch in, etc., and try starting the engine like you normally would.
Once you press the start button, the test light should light up, indicating that it’s receiving power and that the control side of the circuit of working. In that case, the starter relay has gone bad and you need to replace it.
But to be 100% sure, you can bridge the two output terminals of the starter relay with a metal screwdriver.

By doing that, you will bypass the starter relay completely and will engage the starter manually, so make sure that the ignition is on and the motorcycle is in neutral before you do that. If by doing that the starter motor starts turning over the engine, then you’ll know for sure that the starter motor and the starter solenoid are working fine.
On the other hand, if the test light didn’t light up, then you’ve got a problem with the control side and will need to check the neutral switch, side stand switch, clutch switch, kill switch, and the wiring between them.
Be very careful if you decide to bridge the two starter relay terminals! The motorcycle must be in neutral otherwise it will run away once the starter engages. Also, be careful when shorting the terminals to avoid accidentally shorting out something else. Do so at your own risk.
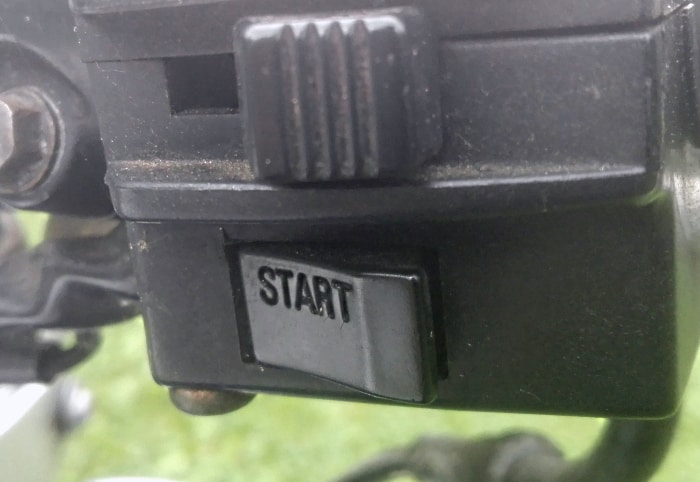
3. Check The Start Button
If the test light did not light up while testing the control side of the start relay in the previous test, then it’s time to move on to the various safety switches that are found on all motorcycles.
Let’s begin with the start button first. They do not last forever and are known to go bad from time to time.
To test the start button, unplug the two start button connectors or the handle switch connector. Using a wiring diagram, find the two wires that go to the start button.
Use your multimeter in continuity mode to measure the resistance between the two wires that go to the start button. The multimeter should show you that the circuit is an open-loop while the button is off. Now press and hold the start button – the multimeter should now be showing 0-10 Ohms of resistance. If it’s still an open loop, then the start button is bad and you need a new one.
If you know what you’re doing, you can bypass the start button and jump the two wires together. Turn the ignition on, kill switch off, transmission in neutral, etc. Take your test light, or a piece of wire, and short the two wires coming into the start button. By doing this you will bypass the start button. Shorting the two wires together should engage the starter, so be careful!
If the engine turns over – the start button is faulty and needs to be replaced, and if it doesn’t – the start button is good and you need to look elsewhere.
4. Check The Side Stand Switch
If that wasn’t it, then it’s time to move on to the side stand switch. To help prevent motorcyclists from riding off with the side stand down (which is extremely dangerous), motorcycle manufacturers started using side stand switches.
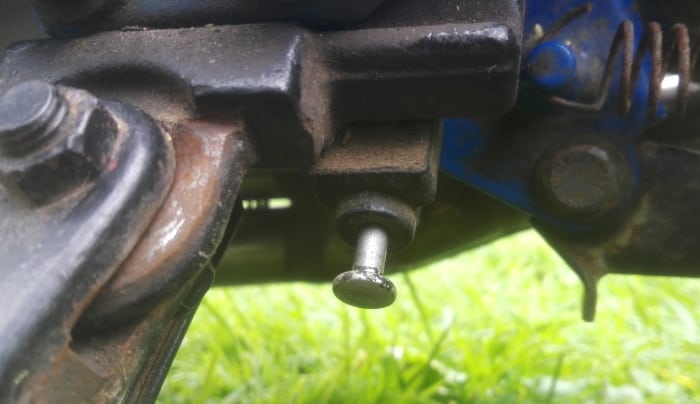
Those switches cannot be any more simple – they’ve got a springloaded pin that gets pushed in when the side stand is up. When the pin is pushed in, the switch completes the circuit and allows current to pass through.
Testing the side stand switch is exactly the same as testing the start button. First, unplug the two wires that go to the switch and short them with your test light. By doing this, we’re completely bypassing the side stand switch. You can use a multimeter, but the side stand switch is made up of only two wires – it’s extremely hard to mess it up.
Turn the ignition on, kill switch off, transmission in neutral, etc. – you know the drill. Start the motorcycle as you normally would. Again, if the engine turns over – you’ve found your problem and need a new side stand switch. If it doesn’t, move on to the next switch.
5. Check The Clutch Switch
The clutch switch is used to prevent the rider from accidentally starting the engine while in gear, and possibly letting the motorcycle run away.
Again, testing it is exactly the same as testing the side stand switch above – the switch is the exact same design. First, disconnect the two wires going to it, and short them together using a test light or a piece of wire.
Turn the ignition on, transmission in neutral, etc. – just like you normally would when starting your motorcycle. Press the start button to try and start the engine. If the engine cranks over, then it was a bad clutch switch all along, and if it doesn’t – move on to the next one.
6. Check The Neutral Switch
The neutral switch has the exact same purpose as the clutch switch – to prevent the rider from starting the engine while it’s in gear. It’s all about redundancy when it comes to motorcycles.
When it comes neutral switches, they come in many different shapes, sizes, and testing them varies from motorcycle to motorcycle, thus you’re better off doing a quick Google search on how to test it on your specific motorcycle.
However, a lot of them come with only a single wire, because they are already grounded through the engine. Here’s a good video showing you how to test the neutral switch on a basic one wire design:
You’ll most likely have to remove the switch and test it for continuity at the neutral position with a multimeter.
7. Check The Kill Switch
It’s very rare for a kill switch to go bad, but it might still happen if you’re unfortunate enough.

Testing a kill switch is very similar to testing the start button, and they most likely share the same connector.
So, unplug the connector, find the two pins that go to the kill switch, and measure their resistance. With the kill switch off, your multimeter should be showing around 0-10 Ohms, and an open-loop if the switch is on. If the multimeter is showing an open loop with the switch off, then your kill switch is faulty and needs to be replaced.
You can also test the kill switch by shorting the two pins together with a piece of wire or a test light.
8. Check The Wiring Between The Switches
If none of the switches are bad, then you’ve got a wiring problem between them.
Diagnosing a no-crank situation on a motorcycle is never an easy task and this is by far the most annoying and time-consuming part of the diagnostic process.
Get a quick visual check on the wiring. Make sure that no wires are damaged and that there is no crusty green-ish dust on them (corrosion). Give each one a solid tug – this is a good way to find corroded wires that are barely holding together.
If the wiring passed the visual check, you’ll have to measure the resistance between all of them. Yes, that means disconnecting the wires from one end and the other, then measuring the resistance of each one. Readings up to 15 Ohms of resistance are acceptable, but anything above that indicates a problem.
Motorcycle Starter Solenoid Bypass (How-To)
Now, what if you’re in the middle of nowhere, with no service around for miles? Could you bypass the starter solenoid and start the engine?
Yes! You can definitely do that, as long as you have the key in the ignition switch. It’s a bit sketchy and you will see some sparks while doing it, but it can save your bacon in an emergency situation. Here’s how you do it:
1. Find the starter solenoid
The starter solenoid (also known as starter relay) is usually located somewhere under the seat and near the battery. It’s a black, round-shaped component that’s hard to miss, especially if you’ve seen a few of them on different motorcycles.
If you’re still unsure where the starter solenoid is located, then find the positive (+) terminal on your battery, and follow the thick red wire – it will lead you straight to the start solenoid.
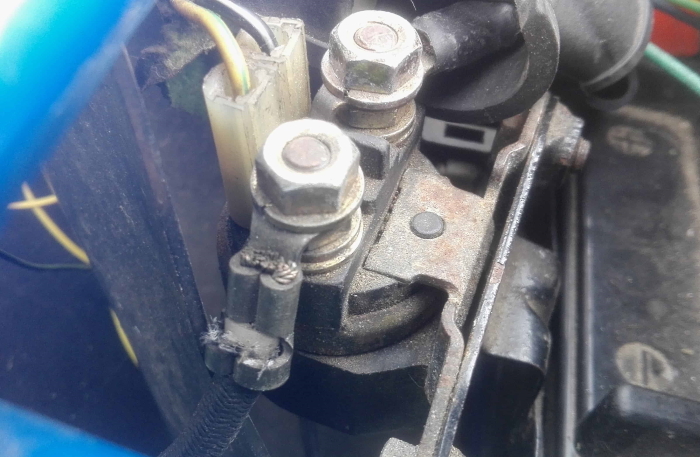
2. Locate The Two Positive (+) Terminals on The Starter Solenoid
One of the two terminals comes straight from the battery and has +12V going to it at all times with the ignition on. The other one is open and does not have any voltage.
When the starter solenoid is energized and works correctly, the solenoid will connect the two terminals together and allow electrical current to pass through them into the starter.
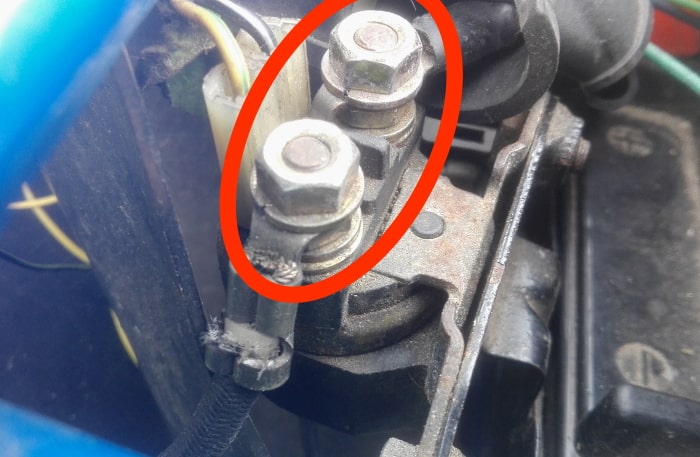
In this case, since the starter solenoid is bad and won’t connect them together – we will connect the terminals ourselves by shorting them.
3. Find a Piece of Metal To short The Solenoid
You’ll have to improvise with this one. Unfortunately, we riders, do not carry any tools with us (usually).
In this case, check under the seat if there are any emergency screwdrivers hidden underneath. If not, your house keys should do the trick.
4. Get Ready to Start The Engine
Turn the ignition on, kill switch off, and make sure that the motorcycle is in neutral.
5. Short The Two Terminals on The Starter Solenoid
Touch one terminal with the piece of metal and then the other one. The starter should now engage and turn over the engine. Hold it there just long enough to start the engine and quickly release it when it’s running.
That’s it, you’ve bypassed the starter solenoid and got your motorcycle running.
Final Thoughts
Having a motorcycle that won’t even try to start is no fun, especially if you’re in the middle of nowhere. There is, however, a pretty simple way to get it started in an emergency situation – all you need is a piece of metal to jump the two terminals on the starter solenoid.
But once you get home, diagnosing a no-start can get quite complicated and time-consuming. Luckily, there are only a handful of components that could go bad and prevent the engine from starting, and if you test them and the wiring integrity between them properly, you’ll be back on the road in no time.
Jake is the site’s primary contributor.
Motorcycles and automotive repair have been a big part of his family for generations, therefore it’s only natural that he decided to become a heavy-duty diesel tech.
Outside of work, you’ll find Jake restoring and riding rare street bikes and ATVs.
Hi,
Having a lot of trouble trying to get an Aprilia shiver to turn over on the starter button, I’ve done as you suggest and unplugged wires to solenoid and with a test light it’s light up on a yellow and red wire to solenoid without pressing the button, when pressing the starter button power dims and goes away the other blue wire to the solenoid I don’t get any light. Bridging the solenoid with a screw driver the bike turns over so solenoid and starter motor appear to be okay all switches appear to operate okay as well any ideas?
Hi Mark!
The Aprilia Shiver has a much more complicated starter system than the one I used in the article. It has an additional Retention Relay that gets power from the ECU, and then sends power to the actual starter relay. Unfortunately, it’s impossible for me to help you diagnose such a complicated start-up logic system over the internet without seeing the bike and without a proper wiring diagram, but I can point you in the right direction.
There is a VERY good thread on this exact issue on ApriliaForum, and you can also find the service manual here with the troubleshooting procedure at page 54.
Hope this helps!
Hi Jake
thanks for the quick reply in touch with someone from the forum now and have asked a couple of questions regarding the start up logic relay you mention in your reply, never knew the bike had one hopefully fingers crossed I can buy one and it will solve the problem.
Thanks
Mark
Hi Jake
nice pointer to for Mark. my bike is too new a 2021 V85TT recently bought with 36000km so i got a great deal. test and ride home 150km no problems, a few short trips locally and now cranks but wont start. it turns over strongly and seen plenty of spark. fuel is fresh. I think i hear the fuel pump falrly quiet but high pitch whine and couple of clicks. any suggestions ?
many thanks
David
Hi David!
You can try (carefully) spraying some starting fluid into the intake to see if the engine starts. If it does, then it’s a fuel starvation problem.
1981 yamaha virago XV750. I did as instructed and seems all wires seem to work. All safty switches are good and fucntion as normal but go to press the start button and still nothing. The started worked before i changed the oil and thats when it stopped working. i have bought new battery new starter motor and relays to rule out the possibility plus i had the extra cash so no real loss. Any idea what it could be?
Hi Kelin!
If you replaced the battery, starter motor, and the relays, then you probably have a wiring problem or a bad connection. It’s also possible that you’ve accidentally bumped a connector while changing the oil, so make sure that the connectors are plugged in and are making good contact. Check the wiring with a test light and a multimeter.
Also, you can get your bike checked out by a competent mechanic if you’re unfamiliar with troubleshooting electrical problems. It could save you time and money.
Yeah I’m close to just having someone take a look at it. The guy I got the bike from was going for a bobber build but stopped because he ended up in a car wreck and I guess it’s was bad so he sold me the bike but took apart the speedometer so I have no indication of what going with the nutural but I did bypass the starter to make sure the bike did not move and it’s in nutural even the relay clicked to confirm all was good to go. Sorry for the long back story. Should I try to replace the factor handle bar switch?
You could replace the switch if you want to, but without thoroughly checking the wiring you’ll be shooting blind. There’s no guarantee that it will fix the bike. I think your best bet is to have a good mechanic check the wiring and tell you which component or wire is bad.