Tire leaks absolutely suck. Not only are they annoying, but they can also be very dangerous at high speeds.
Luckily, if you’ve stumbled upon this article, I would assume that your motorcycle’s tire is leaking slowly, which is not nearly as dangerous as a violent puncture at highway speeds.
Fortunately, there’s only a handful of ways that a tire can develop a leak, and in this article, we will go through all five of them.
Five Ways a Tire Can Develop a Leak
With that out of the way, here are the only five ways a motorcycle tire can leak.
1. Small Puncture in the Tread
I know this is obvious, but let’s get the basics out of the way first. Your tire might have a very small puncture that’s well disguised by discoloration or dirt.
How to Diagnose Tire Punctures in the Tread
To find the leak, clean the tire first. You need to have a clear surface that’s free of dirt and discoloration, in order to have a better chance of spotting the leak. - Spray soapy water or a special leak detector spray around the tread. Look for any bubbles forming – there should be none.
- If that didn’t help, submerge the whole tire into a tub or a pond. This is the best way to find small leaks.
How to Fix Tire Punctures in the Tread
First of all, you can only plug the tire if the puncture is around the center of the tire. The part where the “chicken strips” are located is off-limits, and so is the sidewall.
Second, you can only plug round punctures up to 7mm in diameter. Cuts, tears, etc. are considered unfixable, and rightfully so.
Lastly, the only permanent-ish way to plug a motorcycle tire is by using a combined plug patch, which requires you to remove the tire off the rim and patch it from the inside. Unless you know what you’re doing, it’s best to get it done by a professional.
Now, according to manufacturers, a motorcycle tire that has been fixed with a plug is no longer as safe as a new tire, therefore you shouldn’t go above 70 mph with it. Luckily, if your tire is leaking air slowly, it’s very unlikely that you’ve got a puncture in the tread.
2. Small Puncture in the Sidewall
These are rare, but they do happen from time to time, thus I had to include them. Unfortunately, sidewall punctures are considered unrepairable – at least not long term.
How to Diagnose Sidewall Punctures
- Clean the sidewall of the tire to remove discoloration and dirt.
- Spray soapy water or a special leak detector spray around the sidewall, and watch for bubbles.
- If that’s not enough, submerge the tire into a tub or a pond. Again, watch for bubbles.
Can You Fix Sidewall Punctures?
No, unfortunately. Sidewall punctures are not repairable, because they compromise the structural integrity of the tire. It’s time for a new tire.
3. Bad Seal on the Rim
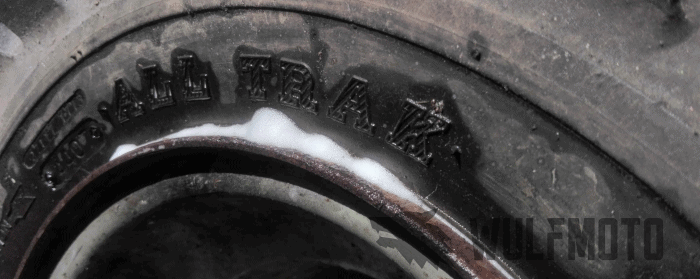
With those obvious two out of the way, let’s get right into the most likely ones. A bad seal around the rim is probably the most common cause of slow tire leaks on motorcycles.
There are a few reasons why that happens: corrosion at the bead seat, dirt at the bead seat, and a cut in the bead of the tire.
I go into a lot more detail about leaks at the rim in this article here.
How to Diagnose Tire Leaks at Rim
- Clean the sidewall of the tire to remove discoloration and dirt.
- Spray soapy water or a special leak detector spray around the sidewall and the rim, and watch for bubbles.
- If that’s not enough, submerge the tire into a tub or a pond. Again, watch for bubbles.
How to Fix Tire Leaks at Rim
Fixing a leak around the rim is quite straightforward. Again, I got into more detail on that in the previous article, but here’s a quick rundown:
- Deflate the tire
- Pop the tire off the bead
- Inspect the bead seat and the rim lip for corrosion, dirt, or high/low spots
- Clean the bead seat with a wire brush to remove corrosion and dirt
- Reseat the bead
- Inflate the tire back to the recommended PSI
4. Bad Valve Stem
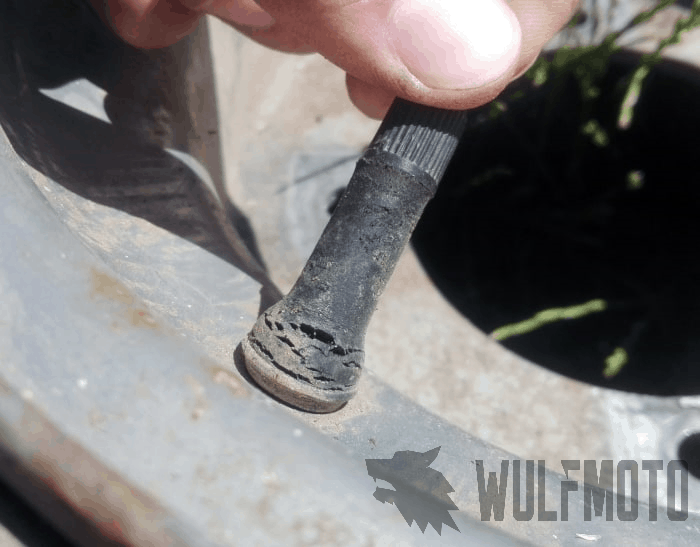
Quite a common cause of slow air leaks. There are two areas in the valve stem where the leaks might occur – the valve core and the rubber body.
Valve core leaks are the most common. There is a small Schrader Valve inside the valve stem. What happens is the rubber seals inside the valve core shrink and harden over time, thus no longer providing an airtight seal.
If it’s not the valve core that’s leaking, then the only other way for the valve stem to leak air is the rubber body itself. The rubber valve stem bodies usually leak due to hairline cracks that happen due to dry rot. That is a very rare occurrence, though.
How to Diagnose a Bad Valve Stem
- Clean the area around the valve stem to remove dirt
- Unscrew the cap
- Spray soapy water or a special leak detector spray around the valve stem and on the valve core.
- Look for bubbles forming – they indicate the exact area of the leak
How to Fix Bad Valve Stem
If the valve core is leaking – replace it with a new one. A new valve core costs cents and is extremely easy to replace. Just unscrew the old leaky core and screw in the new one. However, keep in mind that to unscrew the valve core you will need a special tool. Luckily it only costs a few dollars at most.
If it’s the rubber valve body that’s leaking air – just replace the whole valve stem with a new one. They literally cost cents.
5. Hairline Cracks (Dry Rot)
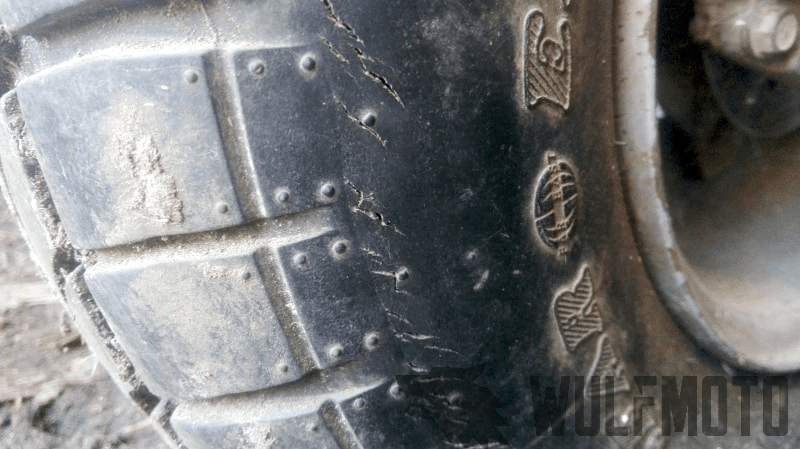
Hairline cracks are caused by dry rot, and dry rot is the start of the end for the tire. Over time, the flexible rubber compound used in tires dries out and starts to develop small cracks. If your tire has hairline cracks on the sidewall, then it’s time to replace it.
How to Diagnose Tire Hairline Cracks (Dry Rot)
- Clean the whole tire to remove dirt and grime.
- Spray soapy water or a special leak detector spray around the tire – especially the sidewall, and be on the lookout for bubbles.
- If that’s not enough, submerge the tire into a tub or a pond. Again, watch for bubbles.
Can You Fix Tire Hairline Cracks (Dry Rot)?
No, at least not permanently and safely. It’s time for new tires.
Conclusion
Slow and small motorcycle tire leaks can take a while to be found. However, there are only a handful of spots where leaks could occur on motorcycle tires. As long as you know these spots, you can save yourself a lot of time.
Now, some leaks are not worth trying to fix (hairline cracks, sidewall punctures, etc). Sure, if you’re in an emergency situation – you’ve got to do what you’ve got to do, but if you’re not stranded somewhere, then there’s no point in trying to fix a tire that is considered unfixable.
Jake is the site’s primary contributor.
Motorcycles and automotive repair have been a big part of his family for generations, therefore it’s only natural that he decided to become a heavy-duty diesel tech.
Outside of work, you’ll find Jake restoring and riding rare street bikes and ATVs.